
How To Plant A Japanese Maple
Japanese Maples are surprisingly easy to grow and maintain in the garden as long as you plant them right, and in the right spot.
This is a somewhat lengthy article because the planting method you use has much to do with how well your Japanese maple will perform over the years. And there are several methods to choose from based on the lay of the land in the planting area and the type and drainage of the soil.
So, before planting a Japanese Maple in your yard make sure to read the points below first and then take a look at planting methods for various situations in order to choose the best one for planting your tree.
Most any garden soil will grow Japanese maples but the soil must be well-drained! Consistently wet or soggy soil around the roots can cause serious problems and even be a killer.
Japanese Maples are generally winter hardy to about minus 20 degrees F, and grow well in Zones 5-9 in the United States.
Japanese maples will grow in sun or shade however, in their natural habitat, you would usually find them growing as understory trees in the dappled sunlight of the forest, or on the edges of woodland borders. Ideally, and especially in the southern, hotter regions of U.S., Japanese maples prefer to be grown in locations that provide some afternoon shade or filtered sunlight. Direct afternoon sunlight in these hotter regions does not kill trees but the newest leaves of some varieties may burn and/or scald. That being said, there are some varieties that grow well in full sun. Check with your local nursery and garden center professional to see what varieties do best in your area.
Depending on the lay of the land, there are generally two different methods for planting a Japanese Maple. One method is for planting on level ground and the other for planting on sloped ground.
 Planting On Level Ground
-
Before planting, test the soil in the area for drainage. Dig a hole 12 inches deep and wide. Fill with water and see how long it takes the water to drain. If the hole drains in just a few hours or less its well-drained. If within 6 to 12 hours it's moderately drained. Anything over that means its poorly drained and steps might need to be taken to improve drainage.
-
If you are planting a container-grown Japanese maple in average garden soil on level ground, begin by digging a hole 2 to 3 times as wide as the root ball or container that the maple is growing in, and about 2/3 as deep as the root ball. Place soil removed from planting hole around outside of of hole.
-
Next, thoroughly mix 1/3 to 1/2 part organic soil amendment, such as mushroom compost, with the native soil removed from hole and break up any clumps or clods as you mix.
-
Next, remove your Japanese maple from the container it was growing in. You may need to use a utility knife to cut container off. Scratch the surface of the root ball to loosen the feeder roots. Do so gently so not to damage the root system
-
Next, if the soil is well- or moderately drained, place the root ball in the planting hole with 1/4 to 1/2 of the root ball above the ground level. (If the soil stays soggy for more than 24 hours after a heavy rain, and there's nothing that can be done to improve drainage, I usually set the root ball on top of the ground.) Add some backfill soil mixture to bottom of hole if necessary to achieve proper height. Also, stand back away from the tree to make sure it is properly positioned. Rotate if necessary to achieve best position and level.
-
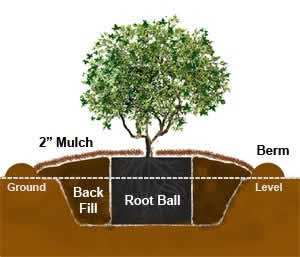
Next, begin backfilling the planting hole by pulling soil around the root ball, tamping lightly as you go to remove any air pockets. When the hole is half-filled, soak with water and then resume backfilling. Backfill to top edge of rootball tapering your soil mixture to existing ground level as shown in the diagram to the right. Essentially, you will be creating a raised mound around the root ball. Do not place any of the backfill mixture on top of the root ball. Do not add fertilizer at this time (although a transplant solution with Vitamin B1 may be beneficial.)
-
Next, use remaining soil mixture to build a water retaining berm around the outside perimeter of the planting hole. This berm will help to catch water from rainfall during the first and second growing season as your tree is becoming established. After the second season the berm can be removed.
-
Next, water deeply.
-
Next, apply a 2" layer of aged, shredded wood mulch or bark or up to 4" layer of pine straw around your newly planted tree. Make sure not to place mulch against the trunk as this can cause disease or other damage - leave a 2" space between mulch and trunk.
-
Next, stake your tree if necessary. Shorter trees usually do not require staking.
Planting a Japanese Maple on SLOPED Ground
If you are planting a Japanese maple on a slope, where there will most likely be good drainage, begin by digging the hole two times as wide as the root ball or container the maple was grown in and to the same depth of the root ball. Place soil removed from planting hole below the planting hole.
Next, mix 1/3 to 1/2 part organic soil ammendment, such as mushroom compost, with the native soil removed from hole and break up any clumps or clods as you mix.
Next, remove your Japanese maple from the container it was growing in. You may need to use a utility knife to cut container off. Scratch the surface of the root ball to loosen the feeder roots. Do so gently so not to damage the root system.
Next, place the rootball in the planting hole and make sure the top edge of rootball is at or slightly above ground level to allow for settling. Add or remove soil to bottom of hole if necessary to achieve proper height. Also, stand back away from the tree to make sure it is properly positioned. Rotate if necessary to achieve best position and level.
Next, begin backfilling the planting hole with the soil mixture tamping lightly as you go to remove any air pockets. When the hole is half-filled, soak with water and then resume backfilling. Do not add fertilizer at this time (although a transplant solution with Vitamin B1 may be beneficial
Next, use remaining soil mixture to build a water retaining berm around the bottom/lower half of the perimeter of the planting hole. This berm will help to catch water from rainfall during the first and second growing season while your tree is becoming established. After the second season the berm can be removed.
Next, water deeply.
Next, apply a 2" layer of aged, shredded wood mulch or bark or up to 4" layer of pine straw around your newly planted tree. Make sure not to place mulch against the trunk as this can cause disease or other damage - leave a 2" space between mulch and trunk.
Next, stake your tree if necessary. Shorter trees usually do not require staking.


41.92- 39.97
One of the most brilliant of all Encore Azaleas, Autumn Bonfire will set your landscape on fire with ...Read more


41.92- 39.97
Huge quantities of bright white flowers on compact plants / 2.5' H x 3'W / Full Sun or Part Shade / ...Read more


58.97- 53.97
Sun or Part Shade / 3-5'H x 2-3'W / Perfect for accentuating entryways or in containers / USDA Zones ...Read more

34.99- 29.97
Evergreen shrub with a dense, rounded habit tolerates full sun with no noticeable burn.

51.97- 44.97
Beautiful tassel like ivory white flowers in spring with bronze new foliage in spring and summer. 3- ...Read more

69.99- 64.97
This low maintenance upright evergreen features brilliant, dark maroon to copper new growth.


62.97- 57.97
Sun or Part Shade / 15'-20'H x 4'-5'W / Lilac-purple flowers in spring and summer on this vine or tr ...Read more

58.97- 46.97
Part Shade / 4'-5'H x 4'-5'W / Heat tolerant with large ruffled deep pink to pink blooms / USDA Zone ...Read more

Southgate Radiance Rhododendron
58.97- 44.97
Part Shade / 4'-5'H x 4'-5'W / Heat tolerant with large ruffled bright lavender blooms / USDA Zones ...Read more

Fjellheim Dwarf Coral Bark Japanese Maple
184.99- 169.97
Sun or Part Shade / 6-8'H x 4-6'W / A dwarf form of the Coral Bark Maple with red branches in winter ...Read more

Mikawa yatsubusa Japanese Maple
239.99- 189.97
The geren leaves of the multi-branched, compact Acer palmatum Mikawa yatsubusa grow closely together ...Read more

189.99- 179.97
New Lil' Anne's Jewel is a stunning lace leaf Japanese Maple that is sometimes known as Lileanne's J ...Read more

61.97- 56.97
Sun or Part Shade / 8-10'H x 4-6'W / Lustrous, colorful red, bronze, and burgundy foliage! / USDA Zo ...Read more

69.99- 64.97
Distinctive oak-shaped leaves and golden variegated foliage set this versatile evergreen holly apart ...Read more

39.97- 30.97
This petite beauty displays dark purple foliage year-round and bursts with lovely pink string cluste ...Read more


